

Preface
I would like to thank you for your interest in medieval shoes and shoemaking. I have had over the years, been approached by many people, asking to learn shoe making. What follows is a compilation of my research and experience. My goal is to create a guide which will help you recreate a pair of medieval shoes in a period manner. This is by no means designed to be an all inclusive or definitive work on medieval shoe construction.
Please feel free to contact me if you have questions at: timurborte@yahoo.com

Table of contents
Preface
Deciding on the shoes to make
Last pattern making
Measuring the foot
Last carving
Patterning off of the last
Cutting leather parts
Assembly of the uppers
Deciding on the shoes to make
The first step in making of medieval shoes, is deciding which ones you want. This first step should include looking at the clothing and the shoes which go with them. Another aspect to consider is the function of the shoes. For example will the shoe be worn to indoor events or will they be used to fight in. Keep these things in mind when looking through sources. Below is a list of sources;
Books
Goubitz, Olaf, Carol van Driel-Murray, and Willy Groenman-Van Waateringe. Stepping through Time: Archaeological Footwear from Prehistoric Times until 1800. ZwoIIe Netherlands: Stichting Promotie Archeologie, 2001.
Grew, Francis, and Margrethe de Neergaard. Shoes and Pattens Medieval Finds from Excavations in London: 2. London: Her Majesty's Stationary Office, 1988.
Mould, Quita, Ian Carlisle, and Esther A. Cameron. Craft, Industry and Everyday Life.~ Leather and Leatherworking in Anglo-Scandinavian and Medieval York. Vol. Vol. 17, Fasc. 16 The Archaeology of York.; the Small Finds. York: Council for British Archaeology, 2003
Internet
Carlson, I. Marc. Foot Ware of the middle ages. 2005. Accessed. Available from http://www.personal.utulsa.edu/~marc-carlson/shoe/SHOEHOME.HTM
Museum of London: http://www.museumoflondonprints.com
Medieval & Renaissance Material Culture, Shoemakers & Cordwainers http://www.larsdatter.com/shoemakers.htm Jan. 14, 2010
Last pattern making
What is a last?
A last is a model of the inside of the shoe, sized to match a few keep measurements of the foot. The last is an invaluable tool in shoe making. As it helps shape the shoe to the proper size and provides a support structure, while the shoe or boot is being built.
Why use a last in shoe making?
First a last is a tool used for shaping the shoe. The material used to create the shoe or boot is stretched over the last to help give the proper fit and shape to the finish product. Secondly leather has the ability to stretch which needs to be reduced to insure the shoe will fit throughout its life time. This is accomplished by stretching the wet leather over the last and fastening into position and allowed to dry.
Last were made of different materials throughout history. Clay was known to be used during the Roman period. Iron lasts are also mentioned in some sources, and most commonly wood was used. Few examples of period last have been discovered in comparison with the number of shoes found.
Period last were created of a large variety of wood: generally what was readily available. The last I have used, I made myself out of pine, because during my research, I have found hard wood last appear beginning in the 1700s. Prior to this only soft wood last are found. Evidence points to a fact that last may have belonged to the client and not the shoemaker, which means far fewer shoes would be made on them than with a standard sized last used for multiple clients, as found in more modern shoe making shops.
I created last by gluing pine 2x6 boards together. I Then use a veriety of tools to shape the wood. Some tools I find helpful are; reciprocating saw, 4” disc grinder with a flapper wheel, hatchet, chisel and hammer. to carve out the rough shape, and then sanded them smooth. The actual techniques used with the last changes, depending on the culture, time period and style of shoes being made. Last also become of greater importance as shoe style and construction increase in complexity.
The first step in building a last is creating a pattern, by tracing the foot. I would suggest using poster board and a pencil. Below are some pictures and explanations of this process.

First step in making a pattern in which to guide your last making efforts is to have someone trace the profile of your foot. Place the poster board on a vertical surface, place your foot against it and stand straight up. (fig. 1)
fig 1
The second step to stand on top of the poster board. The tracing around the outside of the foot should be done with the pencil held straight up and down. (Fig. 2) Trace the foot again with the pencil angled to reach as far under the foot as possible (as pictured below fig. 3). After the tracing is complete, before removing your foot, some reference marks need to be made. One should be made at the center of the heel, one at the ball of the foot, one at the first joint of the small toe, and one between the big and second toe. (See fig. 4)


The tracings will be used to generate a pattern based on the desired shape of the shoe. Below in figure 5 is an example of how the shoe shape around the toes when creating the pattern
fig 5
Measuring the foot
You will want to make accurate measurements of the foot. Take the measurements with the foot suspended in the air, as the foot is smaller and will allow for a better fitting shoe. Make careful notes of these measurements prior to carving the last. Compare these measurements frequently while carving the last. Below is a drawing which will help guide you in this process.

Picture above was found at: http://www.personal.utulsa.edu/~marc-carlson/shoe/SHOEHOME.HTM
Carving the last

The next series of steps is designed to show how to create lasts based on the patterns you created earlier. The first step is to cut four pieces of 2”x 6” pine board. Make sure each piece is the same length and long enough to accommodate the length of the shoe pattern. Glue the pieces together so you have two blocks, two boards thick. (fig. 7) Be sure to cover the entire surface with glue. Clamp the boards together and let then setup over night.
fig 7
Take you pattern of the bottom of the last and trace it on to each block be sure to flip the pattern on the second block, so you have a left and a right. (See fig. 8)
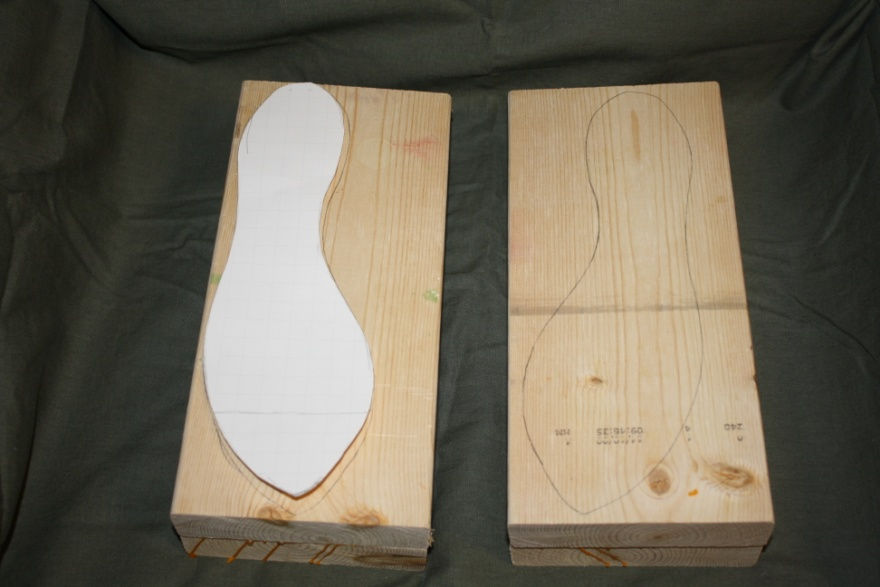
fig 8
After tracing the first pattern on to the block, carve away the excess material until you arrive at blocks resembling fig.9

fig 9
Take the blocks and trace the silhouette pattern on the outside of each block, as in figure 10. Also trace the ankle pattern at this time as well. (fig. 11)
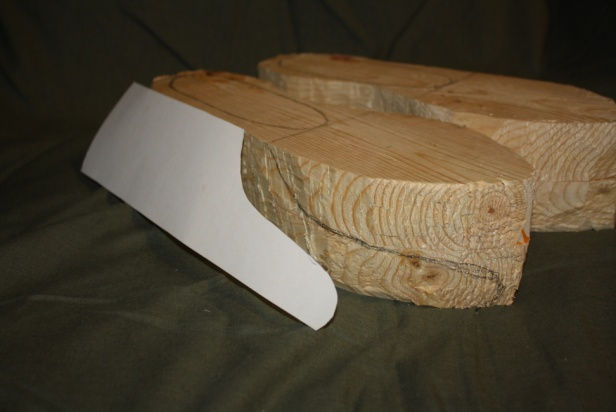
fig 10

fig 11
After tracing the two patterns on to the block, carve away the excess material until you arrive at blocks resembling fig. 12

fig 12
The following pictures should serve as a guide to help you understand the final process of shaping the last.

fig 13

fig 14

fig 15
Patterning off of the last

Once you have your last you will create a pattern, off of the last.The picture on the left (fig. 16) is of a last covered with fabric with tape used to hold it in place. I have used fabric with quite a bit of success. The Fabric will lay out flat and allow you to transfer the pattern more easily to some form of rigid material, such as poster board.
fig 16

The photo on the right (fig. 17) is of another last covered with foam wrap and athletic tape. This method allows for a more form fitting pattern, which is necessary when creating boots which will lace closed and closely follow the curvature of the leg. The resulting tape pattern is more difficult to work with, than the fabric, because it will not lay flat and will require more care when transferring to poster board.
fig 17
After the last is covered, I use a marker to draw the locations of the seams. The seam lines will also be your cut lines for this step.
Transfer the pattern to poster board or some other material, which will allow you to trace around it more easily. For the most part the cut lines will be the same from the fabric to the poster board except the bottom edge. This bottom edge will need to be extended about a half of an inch. This extension is known as the lasting margin, which will be explained in further detail later. Please take note: If the shoes you are creating will require a seam allowance, please add them where appropriate.

Pictured to the left is an example a fabric pattern (fig. 18) and below is an example cardboard pattern after being traced. (fig. 19)
fig 18

Note: I mark all of the pattern pieces left or right prior to cutting them out. (ex: L this side up)
fig 19

You will also want to make a sole pattern. I take a sheet of paper and lay it over the bottom of the last. Use the broad side of the pencil lead; trace the sharp edge of the last. This is the sole area of the last. The resulting will look similar to fig. 20 except in paper. You will want to take this step now, and not earlier because of changes in the sole area created during the carving process of the last.
fig 20
Cutting the leather parts
Now you have your pattern and have selected the leather you are going to use it is time to cut out your shoes. For the upper part of the shoes, or if the shoes you are making use only one type of leather, cut out one complete set of pieces with the marked side of the pattern up. Set those aside and cut out another complete set of pieces with the marked side of the pattern down. Use whatever method you prefer to keep them separated and identified.

Note: I have taken the opportunity to lay pattern pieces together to eliminate some of the seams in the final product. It also helps if you use lots of reference marks to keep things straight.
fig 21
Assembly of the uppers

The first step in assembling the uppers is the stitching in of the heal stiffener. The heal stiffener is a reinforcement piece which is located on the inside of the shoe. Lay the heal stiffener in place and trace it so the intended location can be identified. Such as in fig.22
fig 22
The stitching method used to assemble the heal stiffener to the upper is a tunnel stitch. The needle will travel straight through the heal stiffener from the flesh side to the grain side, and tunnel through the upper entering the flesh side and exiting the flesh side. The following pictured (fig. 23) is an example of how the thread travels.

fig 23
You will use an awl to create the holes needed to sew the pieces together. Below is pictured an example of how this is done. (fig. 24)

Another good source for explanation of all the stitches discussed in this document is:
fig 24
The next stitch used to assemble the uppers is a flesh edge stitch. The edges of the leather will be butted together and sewn together by passing the thread through the flesh side to the edge of one piece, then from the edge to the flesh side of the next piece. This seam is typical done using two needles passing in opposite directions through the same hole. This is known in modern terms as a saddle stitch. The first picture (fig. 25) shows the path of the awl and the second (fig. 26) is an example of the seam itself.

fig 25

fig 26
Lasting the upper
Lasting the upper is the process of stretching the upper section of the shoe over the last. This is usually done while the leather is wet. The desired effect you will be looking for when the upper is properly lasted is, the leather stretched uniformly over the last without wrinkles.
I first start by placing a nail through the heel. This keeps the heel from getting shorter during the stitching process. Secondly I stretch the leather straight over the end of the toe and tack it to the bottom of the last. At this point a nail through the top of the shoe into the top of the last this will help keep the shoe from shifting side to side. The last step is to work your way around the bottom of the last starting at the toe and traveling down each side pulling the leather tight and tacking it in place. Note: to make the toe conform to the desired shape the leather may need to be pleated or gathered. This excess leather will be trimmed off after the sole is attached. See Fig. 27 as an example. The desired out come is for all of the leather of the shoe to be pulled smooth and tight over the last, place as many nails as needed.
Remember if you are making a turned shoe the inside of the shoe will face outward during this process. The right shoe will be placed on the last which looks to be the left foot and vise versa with the left shoe. If the shoe has a opening which is placed on the outside edge of the foot, on the final product it will be on the outside edge during this process also.

fig 27
Figure 28 is an image of the sole and rand as it is cut out of a precut leather sole. The same
techniques could be used to cut the sole and rand out of a piece of vegetable tanned leather. The rand is a triangular piece placed between the sole and upper to help protect the threads and improve water resistance of the shoe.

fig 28
Figure 29 is the sole by itself you should note the edge is trimmed at about a 45 degree angle. Figure 30 is a close up of the rand. Trimming the edge of the sole to an angle and adding the rand allows the leather of the upper part of the shoe to bend less and be kept off of the ground, thus extending the life of the shoe. I find it is easier to pre-punch my holes in the edge of the sole prior to placing them on the last for assembly. (see fig. 31) holes should be placed every ¼” around the outer edge of the sole.

fig 29

fig 30

fog 31
After the upper has dried completely you will remove the nails which hold the upper to the bottom of the last. I then nail the sole in place using two nails. One toward the front and one toward the back approximately centered. Remember on the turn shoe the flesh side of the leather will be exposed during the lasting process. I then start stitching the sole, rand and upper together. The path of the thread will travel from the flesh side of the sole to the edge, then through each edge side of the rand, and finally from the grain side to the flesh side of the upper. Again you will use two needles and pass them each direction through the same set of hole as you did in assembling the uppers. I start at the toe of the shoe and work my way down each side of the shoe toward the heel. I also start with the rand wet and pliable, this help create a much tighter seal on this seam. Figure 32 and 33 are examples of how this seam is performed.

fig 32

fig 33
After the sole seam is complete you will need to trim all of the excess leather off of the upper so it is level with the sole and rand. This is also the point in which all remaining nails should be removed. Figure 34 shows the seam complete and figure 35 demonstrates the trimming process.

fig 34

fig 35

Figure 36 is what your shoe should look like after the excess upper leather is trimmed.
fig 36
The final two steps will be to remove the last from the shoe and the turn the shoe right side out. If you are working in natural leather upper, you will probably find it easier to turn if the shoe is wet.
Side Note: If you try to reinsert the last into the turned shoe, you will find it is difficult to do. This is a result of the outside circumference of the shoe is the same size and all of the thickness of the leather is forced to the inside and takes up part of the space which is needed by the last. At this point I have not needed to reinsert the last to reshape any of the shoes I have made. It can be difficult to maintain the shape of a shoe, made of natural leather. To achieve a nice shape of the finished product reinsertion of the last into the turned shoe may be desired. In order to allow room for the reinsertion of the last, I would add a leather shim between the top of the last and the upper leather during the lasting process see Figure 37. This leather shim is very helpful in creating space needed for removing the last from the finished shoe. Remember the last with the shim must match the measurements of the foot.

fig 37
Supplies and Suppliers
Below is a list of Items and the places they can be purchase. These may not be the only venders you can get these items, so shop around.
Linen Thread: I purchase “Normandy Linen from Green House”
Hill Country Weavers
www.hillcountryweavers.com
(512)707-7396
1701 South Congress Austin Tx 78704
Nails: For lasting I use 18guage x 3/4” Wire nails
Wal-Mart
Needles: I use Harness needles size 000, product #1192-13
Tandy Leather Factory
Last: may be able to get a custom last For “Jones & Vineing”
http://www.jonesandvining.com/
“Panhandle Leather” Leather, awls, sole material, tapered ends, etc….
http://www.panhandleleather.com/
“Maine Thread Company” threads, tapered ends, poly cord, etc……
http://www.mainethread.com/